Export Bulk Data
This topic is for the single-tenant environment (STE) version of Bulk Data Export. If your implementation is a multi-tenant environment (MTE), see the topics in Bulk Data Export (Multi Tenant).
To export data from the 1up FHIR Server for an individual patient, for a group of patients, or for a client ID, you connect to the Export endpoint and execute an Export operation. At any time during the Export operation, you can connect to the Status endpoint to get the current status of your export job. After the data is exported, you receive a list of the files that were exported. You can then connect to the Download File endpoint to download each of the files created by the export process.
For a group export, you must first Create a Group Resource. After you create your group resources, you can export the bulk data for the members of the group.
To ensure the highest level of security and protect your sensitive health information, we require all users accessing 1upHealth services to use a U.S.-based VPN connection.
Export operations don't include FHIR resources that are stored in a shared resource or a shared user environment.
You can also apply search parameters to your request to specify the start date for the data and the type of resources to include in the response.
If you use authorization token access to connect to the Export endpoint and your export job doesn’t complete within two hours, your authorization will expire. If your access expires, to reconnect to the 1up FHIR Server, refresh your access token.
Client header access does not expire.
Before You Begin
Before you start an Export operation, we recommend that you run a test export job that includes a search parameter (such as _type=patient). This will help you to determine how much time is required to complete your Export operation. If you have a large amount of data on your 1up FHIR Server and don’t include a parameter in your export job, it can impact the performance of your Export operation.
If you run an export job without including parameters, the export operation includes all resources in the Client ID or User ID that you specified when you authenticated to the 1upHealth FHIR Server.
Execute the Export Operation
To execute an Export operation, you make a request to the $export API endpoint. We recommend that you include search parameters (_type or _since) in your request to specify which FHIR resources to include in the Export operation.
Before you send your request to the endpoint, make sure that you choose an authorization method and authenticate to the 1up FHIR Server.
If the Export operation is successful, the export job starts automatically.
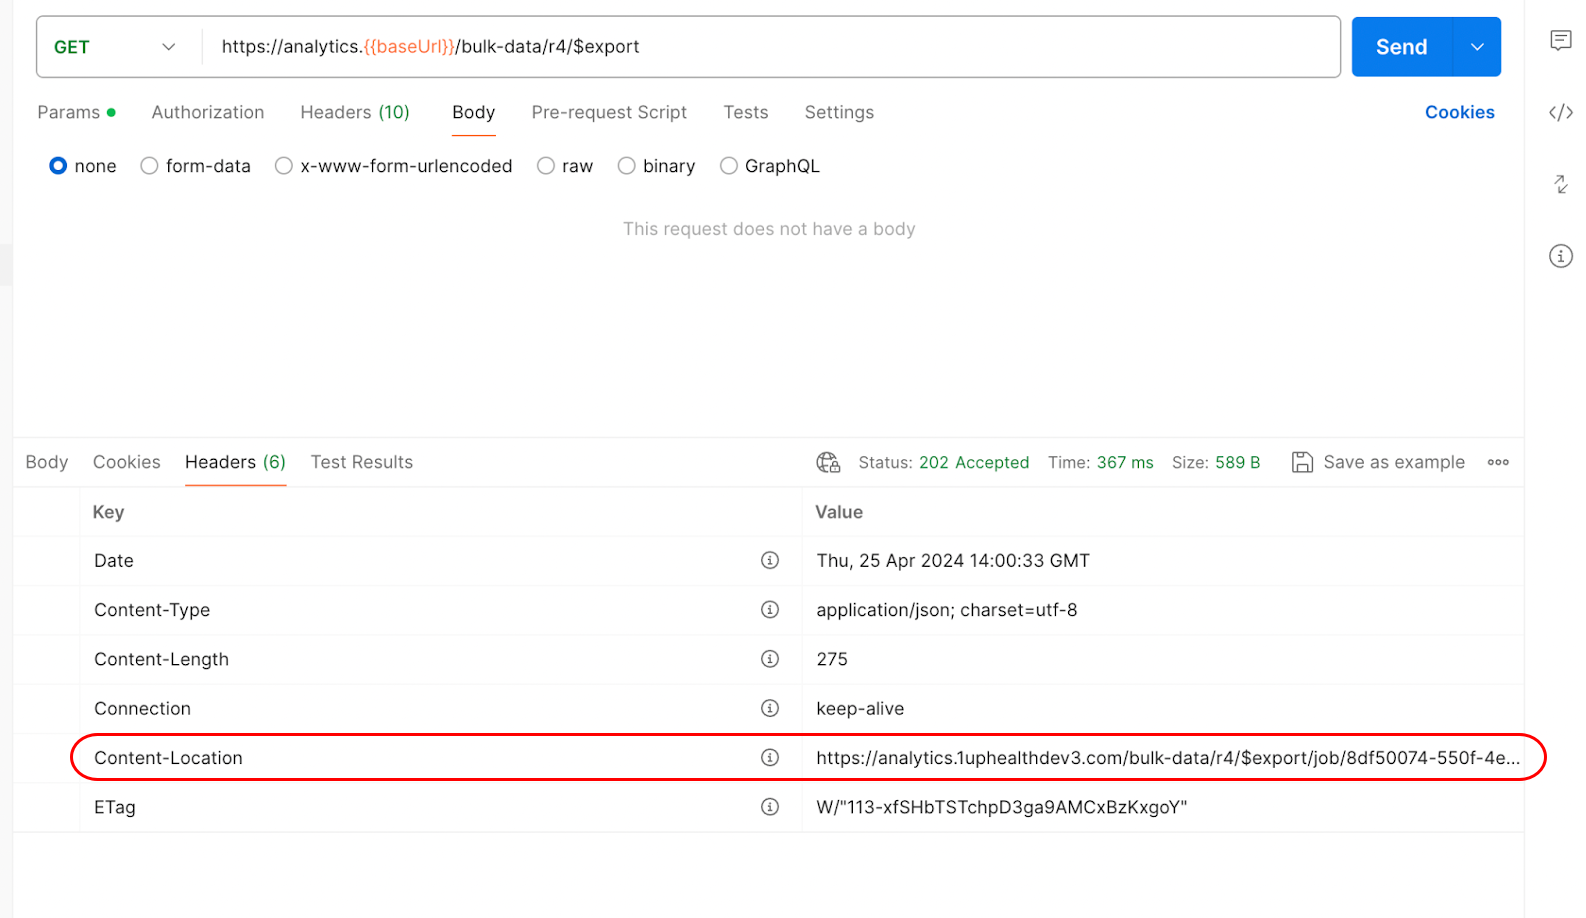
After the GET request completes, you receive a 202 response message that includes the Job ID and the Status endpoint URL in the response message. You can connect to the Status endpoint URL to get the status of your request. When the job has completed, the Status endpoint also provides a list of the NDJSON files that you can download.
After you run the Export job, you can also retrieve the Status endpoint URL for the job from the Content-Location field in the export operation response header. You can use that Content-Location header value to automate retrieval of the Status endpoint URL from the export operation, instead of manually retrieving the Status endpoint from the Export job response.
Verify the Status of the Export Operation
You can send a request to the Status endpoint to get status updates on the export job.
The response for an export job includes the total count of the resources to export (resource_count). It also includes the total number of batches included in the export job, with counts for each status: running, complete, failed, total.
 Example export job status request response (running)
{
"id": "5edebc8a-2514-4ae1-874e-7029785e9639",
"transactionTime": "2023-09-22T17:39:41.461Z",
"request": "http://analytics2.1uphealthdev3.com/bulk-data/r4/$export",
"requiresAccessToken": true,
"status": "In Progress",
"resourceCount": 522645,
"batches": {
"running": 1,
"complete": 22,
"failed": 0,
"total": 23
},
"lastUpdated": "2023-09-22T17:39:44.040Z"
}{
"id": "d1dfde63-68dc-4654-bb01-ebcb83505db1",
"transactionTime": "2023-09-25T18:38:13.238Z",
"request": "http://analytics2.1uphealthdev3.com/bulk-data/r4/$export",
"requiresAccessToken": true,
"status": "Successful",
"resourceCount": 15,
"batches": {
"running": 0,
"complete": 2,
"failed": 0,
"total": 2
},
"lastUpdated": "2023-09-25T18:38:17.711Z",
"output": [
{
"type": "Provenance",
"file": "http://analytics2.1uphealthdev3.com/bulk-data/r4/$export/file/Provenance_5e42f2b3.ndjson"
},
{
"type": "Patient",
"file": "http://analytics2.1uphealthdev3.com/bulk-data/r4/$export/file/Patient_ceabd525.ndjson"
}
]
}Download the Bulk Exported Data
After you execute the bulk export process, you can use the links to the Newline Delimited JSON (NDJSON) files for each of the FHIR resource types (included in the 200 response) to download the NDJSON files and consume the data.
The Status endpoint and the links to your NDJSON files do not expire. You can download the exported data at any time.
Each NDJSON link in the response contains only one FHIR resource type, but can contain thousands of individual FHIR resources. There can also be multiple NDJSON links for a single resource type if the size of the data set requires multiple files.
To download the contents of an NDJSON file, you send a GET request to the URL in the response, using the client credential header method.
After you send the download request, you receive a 200 response with the list of patient resource files.